All-In-One Drum Kit
Imagine the scenario: there’s a groove going on in your head and you can’t wait to sit down and record it. It might be your best idea yet. When you get to your laptop a little later, you fire up Live, bring in a Drum Rack, and start looking for sounds. “Where was that library again with those cool kicks?” Got it! “What snare would go well with this?” You find one that seems to fit. But not completely. You start EQ-ing it. A few minutes later you’re watching a tutorial on snare compression. Then one on making growls in Operator.
Sounds familiar?
Here is something that took me too long to fully understand: when you are inspired to do A, you shouldn’t try to do B. Simple as that. When you are in your creative, beat-making mode, worrying about sound design will do away with the inspiration. Ideas are like butterflies. They appear, and the next minute they’re gone.
Your workflow should enable and encourage you to follow your inspiration not distract you from it. If not used properly, the versatility of a DAW can backfire. Having pre-saved panels helps us stay focused on what’s important.

In this blog post I’m going to build a Drum Rack that works with your flow. It should only feature your favorite sounds, so when inspiration strikes you don’t have to worry about finding them. To get you started, I also put together a selection of one-shots. I went out with a mobile recorder, captured sounds, built Drum Racks, and used tools by UAD, Brainworx, Sonic Academy, Fabfilter, and iZotope to tune, layer, mix and master them. The result is 31 high quality, original sounds — available to download along with the device. For a preview, just click the button below.
Preparation
Start by dragging in a Drum Rack from the Drums folder in the browser. Then get a Sampler from your Instruments folder and put it in the C1 cell of your rack. We’re going to copy this cell to another one, so hold down OPT and drag it to E1. Now copy it to F#1, too.
Load your Samples
Distributing your one-shots equally
Go to your folder that contains your favorite kick sounds, hit CMD + A to select all.
Drop them all onto the Sampler in C1, right where it says “Drop Sample Here”. It should now say something like “8 of 8 Samples Are Selected”.
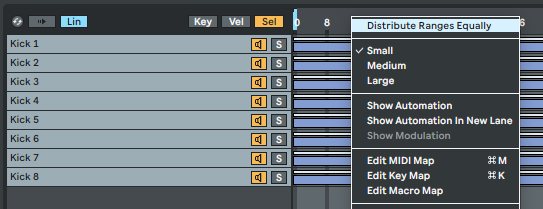
Now click the Zone tab on the Sampler. Go over to the sample selector by clicking the word “Sel” next to “Key” and “Vel”. Now CTRL + click the vertical blue line and select “Distribute Ranges Equally”.
Set up Macros
Now CTRL + click the vertical blue line again and hit “Map to Macro 1”. Repeat the process from loading your samples, to distributing the ranges, to the macro assignments with your snare hits, using the Sampler in E1 and mapping the sample selector to macro 2. Finally, repeat with the hihats, loading them into the Sampler in F#1, and mapping the selector to macro 3.
Tap Away!
That’s it! Now start tapping a beat. What ever groove you have going in your head, just get it out. Don’t worry about the sounds or whether they are the right ones.
Once you’ve put down something you’re happy with rhythmically, use the macro controls to flick through your sounds. Find the best combination of kick, snare, and hihat for your groove.
If you want the hits to be velocity sensitive, switch to the Filter/Global tab on the Samplers and dial in a value for the “Vol<Vel” parameter — for me, 45% tends to work well.
Now head over to the macro controls, and hit CMD + R to rename them. CTRL + click to assign them a color, too.
If you want to get extra creative, you can assign the macros to a MIDI controller and record in automation for the hits to change over time. Or you can switch to the brush mode and draw in automation. Hell, you can even get an LFO tool from the Max For Live folder in the browser, and modulate the macros. Have fun with it, add more instruments — kicks, snares, percussions, etc — what ever you see fit.
Save Your Rack

Save your device by hitting the little floppy disc icon on the Drum Rack. Now next time you have a groove you want to put down quick, just load this device, and start tapping away. Worry about sound design when you are inspired to do that.
Bonus tip: try saving different Drum Racks for different genres.
I hope you’ll find this device useful in your music production. This method invites you to use sounds from different sources. If, as a result, your hits end up sounding too different from one another, using a Drum Buss after the Drum Rack can introduce a nice sense of cohesion or glue.
Using the Drum Rack the way described in this post allows you to focus on being creative when you need it, so your ideas don’t get lost. It’s also super fun to add automation to the macro controls, essentially changing up the drum hits as your beat goes along. Check the video below for that. To get the high quality, original drum sounds, including the device, just click the button at the bottom of the page.